When the lights go out, a portable generator can feel like a lifeline, offering immediate relief and peace of mind. But connecting this powerful machine to your home isn't as simple as plugging it into a wall. In fact, attempting to do so directly is incredibly dangerous – both for your household and for utility workers. Learning How to Safely Connect a Portable Generator to Your House is paramount, transforming a potential hazard into a reliable emergency power source.
This isn't just about convenience; it's about protecting lives and property. Missteps can lead to electrocution, fire, or deadly carbon monoxide poisoning. That's why understanding the proper methods and equipment is non-negotiable.
At a Glance: Your Generator Safety Checklist
- Professional Installation is Key: For any permanent connection to your home's electrical system, always hire a licensed electrician.
- Carbon Monoxide Kills: NEVER run a generator indoors or in partially enclosed spaces.
- Maintain Distance: Place your generator at least 20 feet (6 meters) from your home, directing exhaust away from openings.
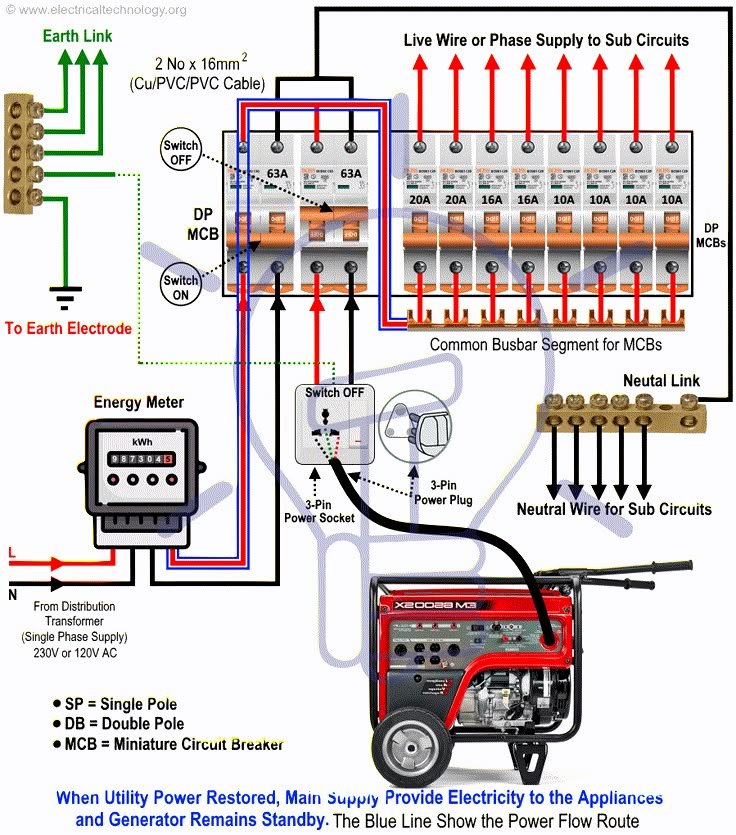
- Prevent Backfeeding: Use a manual transfer switch or an approved interlock kit to prevent power from flowing back into utility lines.
- Ground Your Generator: Ensure the generator frame is properly earth-grounded for permanent connections.
- Size Matters: Choose a generator that can handle your essential loads, and always calculate wattage carefully.
- Consult Local Codes: Your municipality sets specific rules. Always check with local authorities for permits and legal requirements.
The #1 Rule: Professional Installation is Non-Negotiable
Let's cut right to it: if you plan to integrate a portable generator into your home's electrical system, you absolutely must involve a licensed electrician. This isn't a DIY project. High-voltage work carries inherent risks that only a trained professional can safely navigate. They ensure your setup complies with local electrical codes, safety regulations, and insurance requirements, all of which are critical for your family's safety and your home's protection.
Think of it this way: your home's electrical system is a complex network designed to handle specific loads and safely distribute power. Introducing an external power source like a generator without proper controls can disrupt this balance, leading to circuit overloads, equipment damage, or, most critically, dangerous "backfeeding."
Understanding Your Options: Manual Transfer Switches vs. Interlock Kits
When it comes to safely connecting a generator to your home’s electrical panel, you essentially have two approved, code-compliant methods that prevent the generator from interacting dangerously with the utility grid: the Manual Transfer Switch (MTS) and the Interlock Kit. Both serve the vital function of isolating your home from utility power before allowing generator power to flow, eliminating the risk of backfeeding.
The Gold Standard: Manual Transfer Switch (MTS)
A Manual Transfer Switch is widely considered the safest, most reliable, and often legally mandated option for permanent generator connections. It's a dedicated sub-panel installed by an electrician, typically near your main electrical panel.
How it Works:
The MTS acts as a physical gatekeeper. When utility power goes out, you manually flip a switch on the MTS. This physically disconnects your home from the utility grid before connecting it to the generator. It's a "break-before-make" mechanism, meaning utility and generator power can never be active simultaneously.
Benefits:
- Absolute Safety: The physical switch guarantees separation from the utility grid, entirely eliminating backfeeding risks.
- Code Compliant: Generally accepted by all local electrical codes and insurance providers.
- Dedicated Circuits: Often comes with a few pre-wired circuits (e.g., refrigerator, furnace, some lights) allowing you to power specific essential appliances directly.
- Ease of Use: Simple, clear switching operation.
The Budget-Friendly Alternative: Interlock Kit
An Interlock Kit is a more affordable alternative that can be installed on your existing main breaker panel, but it comes with caveats. It's a metal plate that physically prevents the utility main breaker and the dedicated generator breaker from being in the "ON" position at the same time.
How it Works:
An electrician installs a dedicated two-pole breaker in your main panel for the generator. The interlock plate then slides into place, mechanically linking the main utility breaker and the new generator breaker. If the utility breaker is on, the interlock prevents you from turning the generator breaker on, and vice-versa.
Benefits:
- Cost-Effective: Typically less expensive than a full transfer switch.
- Utilizes Existing Panel: No need for a separate sub-panel.
Important Considerations & Caveats: - Legality Varies: Crucially, Interlock Kits are illegal in many areas and jurisdictions. Always consult your local Department of Labor and Industries, Planning Department, or power company to confirm if they are permitted in your region. Do NOT assume legality based on online information.
- Specific Compatibility: You must use an interlock kit specifically approved for your make and model of breaker box. Universal kits do not exist, and using an unapproved one is unsafe and likely illegal.
- Professional Installation Still Required: An electrician must install it correctly to ensure safety and compliance. Incorrect installation can render the interlock useless and create severe hazards.
- Limited Circuits: You're limited to powering circuits directly from your main panel, which means you'll need to decide which breakers to energize.
Consult Local Authorities: Your First Call
Before you buy any equipment or commit to an installation method, make a critical phone call. Contact your local Department of Labor and Industries, Planning Department, or your Power Company. Inquire about:
- Regulations and Necessary Permits: What specific permits are required for generator installation in your area?
- Legal Wiring Systems: Which connection methods (MTS, interlock kit, or others) are legally permissible and safe according to local codes?
- Inspection Requirements: What inspections will be needed after installation?
Relying on internet sources for legal or safety advice is a perilous gamble. Local codes can differ dramatically, and what's allowed in one county might be strictly forbidden (and dangerous) in another.
The Silent Killer: Carbon Monoxide Safety
This warning cannot be overstated: Never operate a portable generator inside a home, garage, basement, or any partially enclosed space. This includes carports, sheds, or under eaves where exhaust can accumulate. Generator exhaust fumes contain carbon monoxide (CO), an odorless, colorless, and highly toxic gas that can kill within minutes.
Key Mandates for CO Safety:
- Outdoor Use ONLY: Generators must always be operated outdoors.
- Distance is Life: Place the generator a minimum of 20 feet (6 meters) away from your home. This distance helps dissipate exhaust fumes.
- Direct Exhaust Away: Ensure the exhaust port is directed away from all windows, doors, and air intake vents (like those for furnaces or air conditioners) to prevent fumes from entering the house.
- CO Detectors: Install battery-operated or battery-backup carbon monoxide detectors on every level of your home, especially near sleeping areas. Test them regularly.
Even a slight breeze can carry CO indoors. Treat this invisible threat with the utmost respect.
Generator Placement & Grounding: Your Outdoor Command Center
Choosing the right spot for your generator is about more than just convenience; it's about ensuring safe operation and protecting the unit itself.
Ideal Placement Checklist:
- Minimum 20 Feet Distance: As reiterated, this is critical for CO safety.
- Away from Openings: Windows, doors, and vents must be clear of exhaust.
- Flat, Dry Surface: Place the generator on a stable, level surface to prevent tipping and ensure proper operation. Avoid muddy or uneven ground.
- Protection from Elements (Optional but Recommended): While generators are designed for outdoor use, protecting them from direct rain, snow, or extreme sun can prolong their life and ensure reliability. However, never enclose a generator in a way that restricts airflow or traps exhaust. Consider a generator tent or canopy specifically designed for safe operation.
- Accessible for Refueling: Ensure you can safely refuel without moving the unit or exposing it to ignition sources.
Mandatory Grounding for Permanent Connections
For permanent connections that utilize a transfer switch or an outdoor power inlet box, proper grounding of the generator frame is mandatory.
Why Grounding Matters:
Grounding provides a safe path for electrical current to flow in the event of a fault (e.g., a short circuit). It helps prevent electrical shock and protects equipment. Without proper grounding, a fault could energize the generator's metal frame, turning it into a dangerous shock hazard.
How it's Done:
An electrician will connect the generator frame to an earth-grounding electrode. This typically involves driving a copper-clad steel ground rod into the earth near the generator's operating location and connecting it to the generator's grounding lug with heavy-gauge wire. Always follow the generator manufacturer's instructions and local electrical codes for grounding.
Fuel Management: Powering Up Safely
Portable generators run on either gasoline or propane. Both require careful handling and storage.
- Approved Containers: Always store fuel in containers specifically approved for gasoline or propane.
- Away from Ignition Sources: Store fuel in a cool, dry, well-ventilated area, away from any heat sources, open flames, or the operating generator itself.
- Quantity: Store only the minimum amount of fuel needed. Gasoline degrades over time, so rotate your supply.
- Refueling Safety:
- NEVER refuel a hot or running generator. Always turn it off and let it cool down before adding fuel.
- Avoid spilling fuel. If a spill occurs, clean it up immediately and ensure fumes have dissipated before restarting.
- Use a funnel to prevent spills.
Sizing Your Generator: Don't Guess, Calculate
One of the most common mistakes homeowners make is underestimating the power they need. A generator too small for your load will constantly trip breakers or struggle, while one too large is an unnecessary expense.
Determine Your Essential Appliances
Start by listing the absolute must-have items during an outage. Resist the urge to power your entire house. Typical portable generators aren't designed for high-power appliances like electric stoves, central air conditioners, electric water heaters, or tumble dryers. Focus on critical items:
- Refrigerator/Freezer
- Lights (a few key circuits)
- Furnace fan (for heat in winter)
- Well pump (if you rely on well water)
- Medical equipment (CPAP, oxygen concentrators)
- TV/Radio for news
- Phone charging
The Wattage Calculation: Running vs. Starting Watts
You need to understand two types of wattage:
- Running Wattage (Rated/Continuous Wattage): This is the power an appliance continuously draws to operate.
- Starting Wattage (Surge Wattage): Motor-driven appliances (refrigerators, pumps, HVAC fans) require a brief, much higher surge of power to start up (often 2-3 times their running wattage). This surge lasts only a few seconds but is crucial for sizing.
How to Calculate Your Total Capacity Needed: - List all essential appliances and find their running wattage. This information is usually on a label on the appliance itself or in its owner's manual.
- Sum the running watts of all the items you plan to operate simultaneously.
- Identify the single highest starting wattage among those items. You only need to account for one starting surge at a time, as you'll typically start appliances sequentially.
- Add the total running watts to the single highest starting wattage. This sum is your minimum generator wattage requirement.
Example Wattage Estimates (Refer to your appliance labels for exact figures):
| Appliance Type | Running Watts (Approx.) | Starting Watts (Approx.) |
| :----------------------- | :---------------------- | :----------------------- |
| Refrigerator (mid-size) | 600 - 800 W | 1200 - 1500 W |
| Freezer (chest) | 500 - 700 W | 1000 - 1400 W |
| Sump Pump | 750 - 1500 W | 1500 - 3000 W |
| Furnace Fan (gas, 1/3 HP) | 300 - 800 W | 800 - 1500 W |
| Microwave (1000 W) | 1000 - 1500 W | N/A |
| Incandescent Lights (60W bulb) | 60 W (per bulb) | N/A |
| LED/CFL Lights (circuit) | 100 - 200 W | N/A |
| Television (50-inch LED) | 80 - 150 W | N/A |
| Laptop Charger | 50 - 100 W | N/A |
| Phone Charger | 10 - 20 W | N/A |
Practical Example:
Let's say you want to run:
- Refrigerator: 700 Running Watts / 1400 Starting Watts
- Furnace Fan: 600 Running Watts / 1200 Starting Watts
- Lights (circuit): 150 Running Watts
- TV: 100 Running Watts
Calculation:
- Total Running Watts: 700 (fridge) + 600 (furnace) + 150 (lights) + 100 (TV) = 1550 Running Watts
- Highest Starting Wattage: Refrigerator (1400W) or Furnace Fan (1200W). We pick 1400W.
- Total Generator Capacity Needed: 1550 (Running) + 1400 (Highest Starting) = 2950 Watts.
A generator rated for at least 3000-3500 running watts (with higher surge capacity) would be appropriate here. Remember, generator power ratings are often expressed in KVA (kilovolt-amperes), where 1 KVA is roughly equal to 1000 watts for resistive loads. Always check the actual wattage rating.
The Essential Gear for a Permanent Connection
To make a safe, permanent connection to your home, you'll need specific, high-quality components.
- Outdoor Power Inlet Box:
- This is a crucial piece of equipment. It's a weatherproof receptacle mounted on the exterior wall of your house.
- It features a recessed male connector (prongs) designed to receive the generator cord.
- It connects via heavy-gauge wiring in conduit to your transfer switch or interlock-protected breaker inside your home.
- Professional installation is vital for ensuring it's properly sealed against the elements and correctly wired to prevent backfeeding.
- Heavy-Duty Generator Cord:
- This is a specialized cord with a four-pronged plug on both ends.
- It must be appropriately rated for the amperage of your generator's maximum output and the inlet box (e.g., 30 amp or 50 amp).
- It's designed to safely carry the power from your generator to the inlet box. Never use extension cords or "cheater" adapters for this connection.
- Ensure the cord is long enough to maintain the 20-foot generator separation distance.
Backfeeding Prevention: The Ultimate Safety Guard
Every component and every step of the installation process for a permanent generator connection is designed with one paramount goal: backfeeding prevention.
Backfeeding occurs when generator power flows back onto the utility lines. This is incredibly dangerous for several reasons:
- Electrocution Hazard: Utility workers who might be repairing lines down the street could be electrocuted by your generator's power. They expect lines to be dead during an outage.
- Damage to Grid: It can damage utility equipment.
- Damage to Generator/Home: It can also damage your generator or household appliances if power surges or conflicts.
A properly installed manual transfer switch or interlock kit is your primary defense against backfeeding.
The Professional Installation Process: What Your Electrician Will Do
While you won't be doing this yourself, understanding the steps an electrician takes can help you appreciate the complexity and why professional help is critical.
- Site Assessment and Planning: The electrician will assess your electrical panel, your chosen generator, and the best location for the outdoor inlet box, taking into account the 20-foot rule and accessibility. They'll confirm local codes and permits.
- Mount the Outdoor Power Inlet Box: A convenient, accessible spot on the exterior wall will be selected. This location must allow the generator to be placed at least 20 feet away with the exhaust directed safely. The box is securely mounted to the house structure.
- Run Conduit and Wiring: From the outdoor inlet box, the electrician will drill through the exterior wall and run appropriate electrical conduit. Heavy-gauge wiring (typically two hot, one neutral, and one ground conductor) is pulled through this conduit, connecting the inlet box to the main electrical panel location inside the house. The conduit protects the wiring and ensures code compliance.
- Install the Internal System:
- Manual Transfer Switch: If opting for an MTS, a dedicated sub-panel (the transfer switch itself) is mounted near your main electrical panel. The selected circuits from your main panel are then re-routed through the transfer switch.
- Generator Interlock Kit: If an interlock kit is chosen (and legal in your area), the electrician will install a new, dedicated two-pole breaker in your main panel for the generator circuit. The interlock plate is then precisely installed, physically linking this new breaker with your main utility breaker, preventing both from being "ON" simultaneously.
- Wire Connections and Testing: All wiring is meticulously connected to the transfer switch or the new generator breaker and the interlock kit. Once all connections are made, the electrician will thoroughly test the entire system to ensure it functions safely and correctly, verifying that backfeeding is impossible. They will also handle any necessary inspections.
Bringing Your Home Back to Life: Step-by-Step Generator Operation
Once your system is professionally installed, operating your generator during an outage becomes a straightforward and safe process.
- Safety First: Place and Connect Generator:
- Move your portable generator to its designated safe outdoor location, at least 20 feet (6 meters) from your home, with the exhaust directed away from all openings.
- If required for your setup, establish the ground rod connection to the generator frame.
- Plug one end of your heavy-duty generator cord into the generator's outlet, and the other end into the outdoor power inlet box on your house. Secure the plug by twisting it if necessary (typically about 15 degrees). Never plug a generator directly into a wall outlet in your home.
- Pre-Start Checks:
- Verify the generator has adequate oil.
- Ensure there's enough fresh fuel (gasoline or propane) for the anticipated run time.
- Consult your generator's user manual for proper choke settings, fuel valve positions, and any preheating procedures (especially below 32°F/0°C).
- Turn Off All Loads:
- Go inside your home.
- Crucially, unplug and turn off all appliances and sensitive electronics. This prevents a surge when generator power comes online and ensures the generator isn't overloaded at startup. Also, flip all individual circuit breakers in your main panel or transfer switch to the "OFF" position.
- Start the Generator:
- Follow your generator manufacturer's instructions precisely (e.g., set choke, open fuel valve, turn the START switch or key).
- Start the engine (pull cord or push start button).
- Warm-up Period:
- Allow the generator to run for approximately 5 minutes to warm up before applying any electrical load. This stabilizes the engine and voltage output. Never start or stop the generator with a load already connected to its outlets.
- Switch Power Source at Your Panel:
- Go to your main electrical panel.
- First, flip off the main utility breaker (the large one that controls all power from the grid). This physically disconnects your house from the utility lines.
- Next, activate the generator power.
- For a Manual Transfer Switch: Move the switch from "Line" (utility) to "Generator" (or "Gen").
- For an Interlock Kit: Slide the interlock plate to allow the generator breaker to be turned on, then flip the dedicated generator main breaker to the "ON" position.
- Energize Circuits Slowly:
- Now, you can begin to turn on the individual circuit breakers for your selected loads, one by one.
- Start with high-demand appliances (like the refrigerator) first, allowing them to start up, then add others. This prevents overloading the generator.
Seamless Transition: Returning to Utility Power
When grid power is restored, reversing the process safely is just as important.
- Turn Off All Generator-Powered Loads:
- Go to your main electrical panel or transfer switch.
- Flip all individual circuit breakers that were powered by the generator to the "OFF" position, one by one. This reduces the load on the generator before shutdown.
- Shut Down the Generator (at the Panel):
- First, disconnect generator power from your house.
- For a Manual Transfer Switch: Move the switch from "Generator" back to the "OFF" or "Neutral" position.
- For an Interlock Kit: Flip the dedicated generator main breaker to the "OFF" position.
- Shut Down the Generator Engine:
- Go to your outdoor generator.
- Turn off the generator's engine using its switch or key. Allow it to cool down before handling the cord.
- Disconnect and Secure Generator:
- Unplug the heavy-duty generator cord from the outdoor power inlet box, then from the generator.
- Store the generator cord in a dry, safe place.
- Once cooled, cover your generator or store it away from the elements.
- Restore Utility Power:
- Go back to your main electrical panel.
- First, ensure the generator main breaker (or transfer switch) is in the "OFF" or "Neutral" position.
- Next, flip the main utility breaker to the "ON" position. Your house is now reconnected to grid power.
- Restore Appliance Power:
- Turn on desired individual circuit breakers in your main panel. You can now plug in and use your appliances as normal.
Why Backfeeding is a Deadly Threat (Again)
It bears repeating: the entire reason for manual transfer switches, interlock kits, and professional installation is to prevent backfeeding. Without these safeguards, if your generator is directly plugged into an outlet (often called "suicide cords") or improperly wired into your home, it can send electricity back through your home's wiring, out onto the utility grid.
- For Utility Crews: Imagine a utility worker trying to repair a downed power line, assuming it's dead, only for your generator to energize it. This is a fatal mistake.
- For Your Home: Backfeeding can also cause severe damage to your generator, your home's electrical system, and any connected appliances when the utility power suddenly returns and clashes with your generator's output.
Always, always ensure your setup prevents backfeeding.
Final Thoughts: Preparedness is Power
Connecting a portable generator to your house safely is a crucial step in preparing for unexpected power outages. It grants you a measure of self-sufficiency and comfort during challenging times. By committing to professional installation of a manual transfer switch or an approved interlock kit, meticulously following safety guidelines for placement and fuel, and understanding the proper operating sequence, you transform a potentially dangerous machine into a reliable ally.
Remember, the initial investment in professional setup and quality equipment is a small price to pay for the safety of your family and utility workers. Stay informed, stay prepared, and power through any outage with confidence.